android 开发
多语言
-
简体:
zh-rCN如values-zh-rCN -
繁体:
zh-rTW如values-zh-rTW - 2字节的语言代码: ISO 639-1
- 2字节的地区代码(可选,前面需加小写的r): ISO 3166-1-alpha-2
- 参考: https://developer.android.com/training/basics/supporting-devices/languages.html
- 参考: https://developer.android.com/guide/topics/resources/localization.html
- 参考: https://developer.android.com/guide/topics/resources/providing-resources.html#table2
内部类导致内存泄漏
- 比如是View里面 应使用 静态类 否则重复创建会导致内存泄漏
- 因为对non-static内部类来说,它会持有一个 外部类的引用 (如Context).所以只要context没有释放内部类就不会释放
ImageSwitcher内存泄漏(BitmapDrawable内存泄漏)
-
Drawable在退出时需要释放 否则内存泄漏
  // 不释放会导致内存泄漏 重复创建移除控件的时候会表现出来
  for (Drawable drawable : pics) {
      drawable.setCallback(null);
      BitmapDrawable bm = (BitmapDrawable) drawable;
      if (null != drawable && !bm.getBitmap().isRecycled()) {
          bm.getBitmap().recycle();
      }
  }
Bitmap导致OOM问题
- OOM的原因并非内存不足,而是c内存不足 原因是曾被java用过的内存c无法使用
-
解决方法: 用 BitmapFactory.decodeStream 解析图片, decodeStream是在c下分配内存, 而其它方法是在java下分配内存
  FileInputStream is = new FileInputStream(new File(s));
  Bitmap bm = BitmapFactory.decodeStream(is);
  this.pics.add(new BitmapDrawable(context.getResources(), bm));
增大应用的heapsize
在<application>添加 android:largeHeap="true"
有些公司的设备adb devices找不到
-
需要在~/.android/adb_usb.ini(无则新建)中添加设备ID 一行一个 如:
#for MINIX
0x2207
其中2207是来自于lsusb的结果[zz@zz-Mint:~]$ lsusb Bus 001 Device 002: ID 8087:0024 Intel Corp. Integrated Rate Matching Hub Bus 002 Device 002: ID 8087:0024 Intel Corp. Integrated Rate Matching Hub Bus 003 Device 011: ID 2207:0006 Bus 001 Device 001: ID 1d6b:0002 Linux Foundation 2.0 root hub
- 每次升级SDK会重置这个文件 所以最好备份下 升级SDK后恢复
参考: http://blog.csdn.net/liuqz2009/article/details/7942569
有些公司的设备adb需要root权限
-
为每个设备新建一个文件(序号不能有重复)
/etc/udev/rules.d/51-minix.rules. -
内容如下 其中2207来自lsusb的输出(见上一条) 即可无需root权限连接设备
SUBSYSTEM=="usb", ATTR{idVendor}=="2207", MODE="0666", GROUP="plugdev" - 参考: https://developer.android.com/tools/device.html
Android shell没有cp命令
使用dd代替 dd if=source_file of=dest_file
使用库项目
- 在项目属性的Android栏中的IsLibrary打勾即可作为库项目, 在其下面可以添加库项目
- 库共享的有代码(含jni部分)和资源, AndroidManifest.xml,asset文件夹不会共享
- 资源同名的会优先使用工作项目的,库项目按列表顺序
- 曾经用过的资源文件名可能导致问题,可以更改资源文件名,删除gen目录应该也可以
- 使用库项目需添加库项目所用项的权限
webview跳转链接时仍使用自己打开
private class MyWebViewClient extends WebViewClient {
      public boolean shouldOverrideUrlLoading(WebView view, String url) {
          // 使用当前的WebView加载页面
          view.loadUrl(url);
          return true;
      }
  }
this.setWebViewClient(new MyWebViewClient());
webview播放flash视频
- 安装flash插件: http://helpx.adobe.com/flash-player/kb/archived-flash-player-versions.html
-
在AndroidManifest.xml的application标签中添加
android:hardwareAccelerated="true"
xml中写入复杂或多行字符串
在<string>或<string-array>中加入formatted="false"属性 可视字符串为原始字符串 不需要特殊处理% 换行也会被忽略(需要换行手动加\n)
距离单位转换
- mm转为pix示例 value单位为mm
- pix = value * getResources().getDisplayMetrics().xdpi * (1.0f / 25.4f);
-
其它单位转换参考:
switch (unit) { case COMPLEX_UNIT_PX: return value; case COMPLEX_UNIT_DIP: return value * metrics.density; case COMPLEX_UNIT_SP: return value * metrics.scaledDensity; case COMPLEX_UNIT_PT: return value * metrics.xdpi * (1.0f/72); case COMPLEX_UNIT_IN: return value * metrics.xdpi; case COMPLEX_UNIT_MM: return value * metrics.xdpi * (1.0f/25.4f); } - 参考: http://stackoverflow.com/questions/14569963/converting-pixel-values-to-mm-android
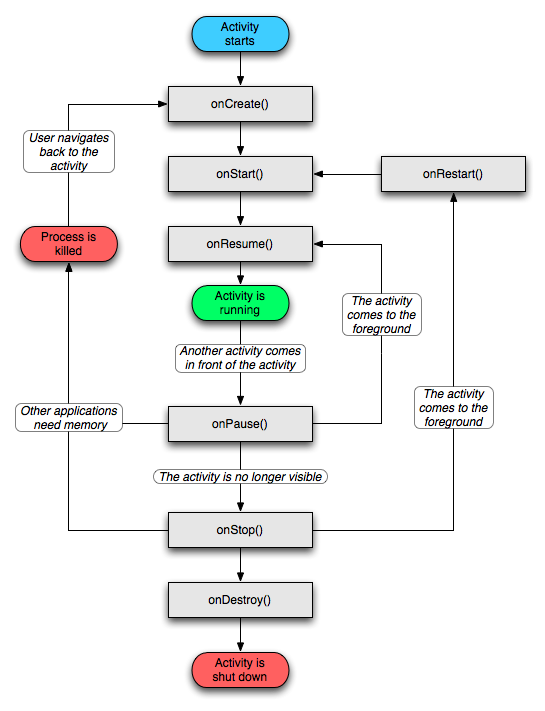
Activity生命周期
Activity栈
<activity>里的android:launchMode与activity的跳转栈相关
- standard 在栈顶新建创建
- singleTop 栈顶是要建的则不建 将intent发给原activity
- singleTask 栈中只要有就将intent发给原activity
- singleInstance 全局(如别的进程调用的共享activity)中只有一个实例
intent.setFlags() 也是 activity的跳转栈相关
- FLAG_ACTIVITY_CLEAR_TOP 把原activity之上的activity记录全删掉
- FLAG_ACTIVITY_NEW_TASK 如需要则新建activity栈 从非activity启动activity需要
- FLAG_ACTIVITY_NO_HISTORY 目标activity不存在栈中
- FLAG_ACTIVITY_SINGLE_TOP 同singleTop
模拟器
- 以指定的内存和rom大小启动模拟器: emulator -avd avd4 -memory 256 -partition-size 256,or emulator -partition-size 1024 @avd10
代码混淆
不能混淆的部分:
- 会被反射的类
- 依赖于系统的接口,比如系统的回调方法
- 文件中指定类名的
apk反编译
- 所需工具: dex2jar Jad 1.5.8e for Linux (statically linked)
-
用以下脚本反编译
decodeapk.sh xxx.apk#!/usr/bin/env bash apk=$1 echo $apk jad="jad158e.linux.static/jad" dex2jar="dex2jar-0.0.9.15/d2j-dex2jar.sh" apkdir=$apk"_tmpdir" srcdir=$apk"_srcdir" unzip $apk -d $apkdir $dex2jar $apkdir/classes.dex unzip classes-dex2jar.jar -d $apkdir/classes_dex2jar rm classes-dex2jar.jar $jad -o -r -sjava -d$srcdir $apkdir/classes_dex2jar/**/*.class #有的文件夾/**/會失效 需要直接寫如 #$jad -o -r -sjava -d$srcdir $apkdir/classes_dex2jar/*.class apktool="apktool1.5.2/apktool.jar" #get apk resources #java -jar $apktool d $apk
APK签名
-
生成keystore证书
keytool -genkey -v -keystore abc.keystore -alias abc.keystore -keyalg RSA -validity 20000
第一个abc.keystore为证书文件名, 第二个为证书名 会提示问题啥的, 需要记住密码, 使用此证书签名时需要 -
导出未签名apk
在eclipse项目右键->Android Tools->Export Unsigned Application Package -
签名:
jarsigner -verbose -keystore zzlab.keystore -signedjar comiz_signed.apk comiz.apk zzlab.keystore
优化:zipalign -v 4 comiz_signed.apk comiz_signed_aligned.apk
签名及优化的批处理py:#!/usr/bin/python import os import sys def show_usage(): print 'usage:\nsign.py [-k] apk\n-k\tkeep origin apk\nexample: sign.py comiz.apk' % () if __name__ == '__main__': #print sys.argv argc = len(sys.argv) if argc != 2 and argc != 3: show_usage() exit() keypath = '/mnt/DATA/dev/zzlab.keystore' keyname = 'zzlab.keystore' zipalign = '/mnt/DATA/dev/android-sdk-linux/tools/zipalign' keep = False if sys.argv[1] == '-k': keep = True originapk = sys.argv[argc-1] pair = os.path.splitext(originapk) signedapk = pair[0]+'_signed'+pair[1] if not os.path.exists(originapk): print 'Error: No such file.' exit() if os.path.exists(signedapk): os.remove(signedapk) cmd = 'jarsigner -verbose -keystore "%s" -signedjar "%s" "%s" %s' % (keypath, 'tmpapk', originapk, keyname) print cmd if os.system(cmd) != 0: print 'failed' exit() cmd = '%s -v 4 "%s" "%s"' % (zipalign, 'tmpapk', signedapk) print cmd if os.system(cmd) != 0: print 'failed' exit() os.remove('tmpapk') if not keep: os.remove(originapk) print 'ok' -
查看签名1:
jarsigner -verify -verbose -certs xxx.apk -
简明查看任意个apk
./showapkcert.sh a.apk b.apk#!/bin/bash mkdir temp_for_certificate cd temp_for_certificate count=0 while [ -n "$1" ] do count=$[$count+1] echo "(#$count) "`basename "$1"`":" echo "" path=`jar tf "../""$1" | grep RSA` #查找apk中RSA文件 echo $path jar xf "../"$1 $path #把RSA文件解压出来 keytool -printcert -file $path #查看指纹证书 rm -r $path #删除之前解压的文件 echo "--------------------------------------------" shift done cd .. rm -rf temp_for_certificate
代码
获取相对路径
  private String getRelaPath(File root, File path) {
      return path.getAbsolutePath().substring(root.getAbsolutePath().length() + 1);
  }
service中使用Toast
  final String text = s;
  new Handler(Looper.getMainLooper()).post(new Runnable() {
      public void run() {
          Toast.makeText(getApplicationContext(), text,
                  Toast.LENGTH_SHORT).show();
      }
  });
显示等待框
m_Dialog=ProgressDialog.show(this, "请等待...", "正在拷贝资源文件,请稍后...",true);
new Thread(){
  @Override
  public void run() {
      super.run();
      //do something for long time
      m_Dialog.dismiss();
  }
}.start();
显示其它activity之上的view
WindowManager wm = (WindowManager) getApplicationContext()
		.getSystemService(WINDOW_SERVICE);
WindowManager.LayoutParams params = new WindowManager.LayoutParams();
params.type = WindowManager.LayoutParams.TYPE_SYSTEM_ALERT; //overlay显示等级过高
//TYPE_SYSTEM_ALERT需要配合这些flag否则为modal类型
params.flags |= WindowManager.LayoutParams.FLAG_NOT_FOCUSABLE
		| WindowManager.LayoutParams.FLAG_NOT_TOUCH_MODAL;
params.gravity = gravity;
params.width = WindowManager.LayoutParams.MATCH_PARENT;
params.height = h;
wm.addView(msgView, params);
注: 需要用wm.removeView(msgView);手动释放view
使用Paint计算字符串宽高
-
高度:
  Paint.FontMetrics fontMetrics = mPaint.getFontMetrics();
  fontMetrics.bottom – fontMetrics.top 即字符串的完整高度
详情可参考http://www.jcodecraeer.com/a/anzhuokaifa/androidkaifa/2013/0409/1143.html -
宽度:
Paint.measureText函数可得真实宽度 注:不要用getTextBounds
VideoView拉伸至指定大小
  private int width;
  private int height;
  @Override
	protected void onMeasure(int widthMeasureSpec, int heightMeasureSpec) {
// 只有直接指定大小才能伸展到设定的大小
setMeasuredDimension(width, height);
	}
通过代码全屏
在setContentView之前
requestWindowFeature(Window.FEATURE_NO_TITLE);
getWindow().setFlags(WindowManager.LayoutParams.FLAG_FULLSCREEN, WindowManager.LayoutParams.FLAG_FULLSCREEN);
隐藏导航栏(Navigation Bar)
-
隐藏系统栏 注:原生android系统只有手机(handset)可以 不支持tablet
getWindow().getDecorView().setSystemUiVisibility(View.SYSTEM_UI_FLAG_HIDE_NAVIGATION);
-
使系统栏不显眼
getWindow().getDecorView().setSystemUiVisibility(View.SYSTEM_UI_FLAG_LOW_PROFILE);
显示提示对话框(MessageBox)
  public static void ShowMessage(Context ctx, String msg) {
      AlertDialog.Builder dialog = new AlertDialog.Builder(ctx);
      dialog.setMessage(msg);
      dialog.show();
从raw文件夹拷贝文件
  public static void copyRaw2Sdcard(Context context, int id, File target, boolean rewrite) {
      File f = target;
      String targetPath = f.getAbsolutePath();
      if (!f.exists() || rewrite) {
          File dir = new File(targetPath.substring(0,
                  targetPath.lastIndexOf(File.separator)));
          if (!dir.exists() && !dir.mkdirs()) {
              Log.e("zz", "can't create directory!");
          }
          InputStream ins = context.getResources().openRawResource(id);
          try {
              byte[] buf = new byte[8 * 1024];
              int size;
              FileOutputStream fos = new FileOutputStream(f);
              while ((size = ins.read(buf)) != -1)
                  fos.write(buf, 0, size);
              ins.close();
              fos.close();
          } catch (FileNotFoundException e) {
              Log.e("zz",
                      "can't create file:" + e.getMessage());
          } catch (IOException e) {
              Log.e("zz",
                      "can't create file:" + e.getMessage());
          }
      }
  }
获取ip地址
  public static String getLocalIpAddress() {
      String ip = "";
      try {
          for (Enumeration<NetworkInterface> en = NetworkInterface.getNetworkInterfaces(); en.hasMoreElements(); ) {
              NetworkInterface intf = en.nextElement();
              for (Enumeration<InetAddress> enumIpAddr = intf.getInetAddresses(); enumIpAddr.hasMoreElements(); ) {
                  InetAddress inetAddress = enumIpAddr.nextElement();
                  if (!inetAddress.isLoopbackAddress() && InetAddressUtils.isIPv4Address(inetAddress.getHostAddress()))  //这里做了一步IPv4的判定
                  {
                      ip = inetAddress.getHostAddress().toString();
                      return ip;
                  }
              }
          }
      } catch (SocketException e) {}
      return ip;
  }
安装软件包
	void installApk(Context context, File apkfile) {
		Intent intent = new Intent(Intent.ACTION_VIEW);
		intent.setDataAndType(Uri.fromFile(apkfile),
				"application/vnd.android.package-archive");
		context.startActivity(intent);
	}
用root权限运行shell命令
	public static boolean runAsRoot(String cmd) {
		Process process = null;
		DataOutputStream os = null;
		try {
			process = Runtime.getRuntime().exec("su"); // 切换到root帐号
			os = new DataOutputStream(process.getOutputStream());
			os.writeBytes(cmd + "\n");
			os.writeBytes("exit\n");
			os.flush();
			process.waitFor();
		} catch (Exception e) {
			return false;
		} finally {
			try {
				if (os != null) {
					os.close();
				}
				process.destroy();
			} catch (Exception e) {
			}
		}
		return true;
	}

    // 如需挂载/为rw
    mount -o remount,rw rootfs /
    用完后: mount -o remount,ro rootfs /

    // 示例:修改系统时间
    SimpleDateFormat sdf = new SimpleDateFormat("yyyyMMdd.HHmmss", Locale.US);
	Calendar cal = Calendar.getInstance();
	cal.set(Calendar.HOUR_OF_DAY, 4);
	String datetime = sdf.format(cal.getTime());
	String command = "date -s \"" + datetime + "\"";
	Log.e("zz", command);
	runAsRoot(command);
运行shell命令
	public static boolean run(String cmd) {
		Process process = null;
		DataOutputStream os = null;
		try {
			process = Runtime.getRuntime().exec(cmd);
		} catch (Exception e) {
			return false;
		} finally {
			try {
				if (os != null) {
					os.close();
				}
				process.destroy();
			} catch (Exception e) {
			}
		}
		return true;
	}
任何线程都可使用的toast
public class ToastMessageTask extends AsyncTask<String, String, String> {
	Context context;
	String toastMessage;
	int lengthtype;

	ToastMessageTask(Context context, String msg, int lengthtype) {
		this.context = context;
		this.toastMessage = msg;
		this.lengthtype = lengthtype;
	}

	@Override
	protected String doInBackground(String... params) {
		return "";
	}

	// This is executed in the context of the main GUI thread
	protected void onPostExecute(String result) {
		Toast toast = Toast.makeText(context, toastMessage,
				lengthtype);
		toast.show();
	}
}
使用:
new ToastMessageTask(ctx, "this is a toast", Toast.LENGTH_LONG).execute();
NDK
使用预编译的.a或.so
加上这段
include $(CLEAR_VARS)
LOCAL_MODULE := lua
LOCAL_SRC_FILES := liblua.a
include $(PREBUILT_STATIC_LIBRARY)
LOCAL_MODULE是赋予之一个名字 使用时使用那个名字:
LOCAL_STATIC_LIBRARIES := lua
.so使用PREBUILT_STATIC_LIBRARY
sqlite
shell 操作 sqlite
貌似需要解锁的机器
adb shell
cd /data/data/xxx.xxx.xx/databases
sqlite3 databasename
命令需在前面加. 如".quit"
sql语句需加; 如"select * from xx;"
安装sqlite3工具
http://blog.csdn.net/ygc87/article/details/7452422
eclipse
导入工程
新建同名工程 然后`git co .`恢复被修改内容
导入android框架源码
- 任选一个eclipse工程 进入其Build path设定
-
在
Libraries-Android4.2.2-android.jar编辑其Source attachment选择External folder...选择源码文件夹(内含framworks等文件夹以及Makefile)
代码混淆
-
在project.properties文件中混淆配置文件
proguard.config=proguard-project.txt - 导出apk(build产生的debug签名的apk不会混淆)
eclipse故障排除
eclipse打开失败
log显示"org.eclipse.swt.SWTException: Failed to execute runnable (java.lang.NullPointerException"
-
解决方法:
eclipse -clean -clearPersistedState - 参考: http://stackoverflow.com/a/16901800/2775335
shell操作
模拟按键
input keyevent <event_code>
例 模拟POWER按键: input keyevent 26
0 -->  "KEYCODE_UNKNOWN"
1 -->  "KEYCODE_MENU"
2 -->  "KEYCODE_SOFT_RIGHT"
3 -->  "KEYCODE_HOME"
4 -->  "KEYCODE_BACK"
5 -->  "KEYCODE_CALL"
6 -->  "KEYCODE_ENDCALL"
7 -->  "KEYCODE_0"
8 -->  "KEYCODE_1"
9 -->  "KEYCODE_2"
10 -->  "KEYCODE_3"
11 -->  "KEYCODE_4"
12 -->  "KEYCODE_5"
13 -->  "KEYCODE_6"
14 -->  "KEYCODE_7"
15 -->  "KEYCODE_8"
16 -->  "KEYCODE_9"
17 -->  "KEYCODE_STAR"
18 -->  "KEYCODE_POUND"
19 -->  "KEYCODE_DPAD_UP"
20 -->  "KEYCODE_DPAD_DOWN"
21 -->  "KEYCODE_DPAD_LEFT"
22 -->  "KEYCODE_DPAD_RIGHT"
23 -->  "KEYCODE_DPAD_CENTER"
24 -->  "KEYCODE_VOLUME_UP"
25 -->  "KEYCODE_VOLUME_DOWN"
26 -->  "KEYCODE_POWER"
27 -->  "KEYCODE_CAMERA"
28 -->  "KEYCODE_CLEAR"
29 -->  "KEYCODE_A"
30 -->  "KEYCODE_B"
31 -->  "KEYCODE_C"
32 -->  "KEYCODE_D"
33 -->  "KEYCODE_E"
34 -->  "KEYCODE_F"
35 -->  "KEYCODE_G"
36 -->  "KEYCODE_H"
37 -->  "KEYCODE_I"
38 -->  "KEYCODE_J"
39 -->  "KEYCODE_K"
40 -->  "KEYCODE_L"
41 -->  "KEYCODE_M"
42 -->  "KEYCODE_N"
43 -->  "KEYCODE_O"
44 -->  "KEYCODE_P"
45 -->  "KEYCODE_Q"
46 -->  "KEYCODE_R"
47 -->  "KEYCODE_S"
48 -->  "KEYCODE_T"
49 -->  "KEYCODE_U"
50 -->  "KEYCODE_V"
51 -->  "KEYCODE_W"
52 -->  "KEYCODE_X"
53 -->  "KEYCODE_Y"
54 -->  "KEYCODE_Z"
55 -->  "KEYCODE_COMMA"
56 -->  "KEYCODE_PERIOD"
57 -->  "KEYCODE_ALT_LEFT"
58 -->  "KEYCODE_ALT_RIGHT"
59 -->  "KEYCODE_SHIFT_LEFT"
60 -->  "KEYCODE_SHIFT_RIGHT"
61 -->  "KEYCODE_TAB"
62 -->  "KEYCODE_SPACE"
63 -->  "KEYCODE_SYM"
64 -->  "KEYCODE_EXPLORER"
65 -->  "KEYCODE_ENVELOPE"
66 -->  "KEYCODE_ENTER"
67 -->  "KEYCODE_DEL"
68 -->  "KEYCODE_GRAVE"
69 -->  "KEYCODE_MINUS"
70 -->  "KEYCODE_EQUALS"
71 -->  "KEYCODE_LEFT_BRACKET"
72 -->  "KEYCODE_RIGHT_BRACKET"
73 -->  "KEYCODE_BACKSLASH"
74 -->  "KEYCODE_SEMICOLON"
75 -->  "KEYCODE_APOSTROPHE"
76 -->  "KEYCODE_SLASH"
77 -->  "KEYCODE_AT"
78 -->  "KEYCODE_NUM"
79 -->  "KEYCODE_HEADSETHOOK"
80 -->  "KEYCODE_FOCUS"
81 -->  "KEYCODE_PLUS"
82 -->  "KEYCODE_MENU"
83 -->  "KEYCODE_NOTIFICATION"
84 -->  "KEYCODE_SEARCH"
85 -->  "TAG_LAST_KEYCODE"
am命令
启动Activity
-
格式:
$ am start -n {包(package)名}/{包名}.{活动(activity)名称} -
例:
am start -n com.example.hello/com.example.hello.MainActivity -
或:
am start -n com.example.hello/.MainActivity
强制停止程序
-
格式:
$ am force-stop {包名} -
例:
am force-stop com.example.hello
截屏
screencap -p /sdcard/screen.png